Kitchen Cabinet Painting in Liberty, MO. Give Your Kitchen a Fresh Look Without a Full Remodel
A full kitchen remodel is expensive and disruptive. Painting your cabinets gives you a current, polished look for a fraction of the cost. We prep, prime, and topcoat wood, MDF, and laminate cabinets so the finish holds up to daily use. Call (816) 466-4510 to book a walkthrough estimate.
In Liberty, MO, cabinet painting transforms a worn or dated kitchen without the cost and upheaval of a full remodel.
This page covers professional kitchen cabinet painting for Liberty homes. We repaint wood, MDF, and laminate cabinets, taking dated oak, builder-grade white, and worn finishes to a clean, current look. The job runs prep, prime, paint, and a light hardware swap if you want one, all handled by a licensed local crew.
Below you will learn how to tell whether your cabinets are a good candidate, which colors are working in Liberty kitchens right now, and what the process looks like start to finish. When you are ready, the next step is simple: book a walkthrough so we can confirm the condition of your cabinets in person. Call us at (816) 466-4510 and we will take a look.
Quick Answer
What is kitchen cabinet painting in Liberty, MO?
Kitchen cabinet painting refinishes your existing cabinet boxes and doors with a prep, prime, and topcoat process instead of replacing them. It is the right choice for cabinets with a dated or worn finish that are still structurally sound, not water-damaged. In Liberty, it is especially popular for the original 1990s oak in older ranch homes, where humidity makes proper prep and full cure time essential.
- Timing. Takes 2 to 4 days for an average kitchen.
- Surfaces. Covers wood, MDF, and laminate cabinet boxes.
- First step. Book a walkthrough to confirm cabinet condition.
How to Tell If Your Kitchen Cabinets Need Paint or Replacement
If your cabinets look tired but you are not sure whether they are worth saving, this is the question to settle first. The good news is that you can self-diagnose most of it before anyone comes out. The deciding factor is structure, not appearance. Cabinets that are solid, square, and free of water damage are almost always better candidates for paint than replacement, even when the finish looks rough.
Look for peeling, yellowing, scratches, and dated color. Those are all surface problems that paint solves. Then check the things paint cannot fix: swollen or soft boxes, delaminating laminate, doors that no longer hang straight, and any sign of water damage under the sink. If the bones are good, painting saves you thousands over a tear-out. If the boxes are failing, replacement is the smarter spend.
This matters in Liberty because so many homes built in the 1980s and 1990s still have their original oak cabinets. That wood was built solid, and it takes paint beautifully once it is properly cleaned and primed. A walkthrough confirms the condition in a few minutes, and most of the time the answer is that your existing cabinets are well worth painting.
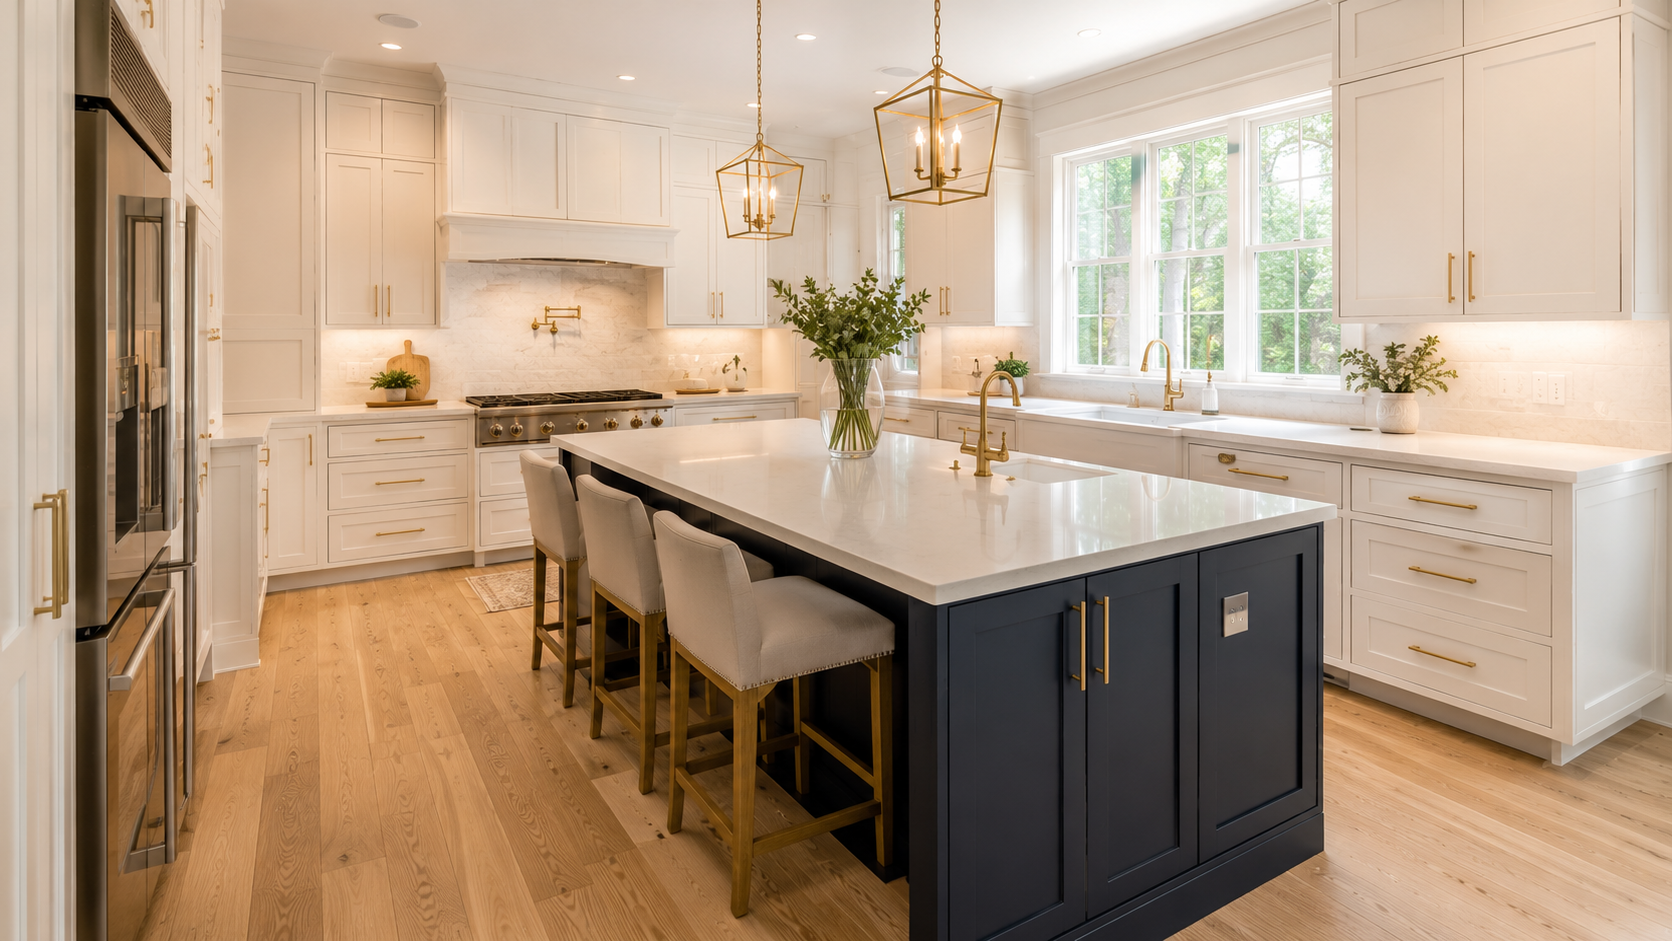
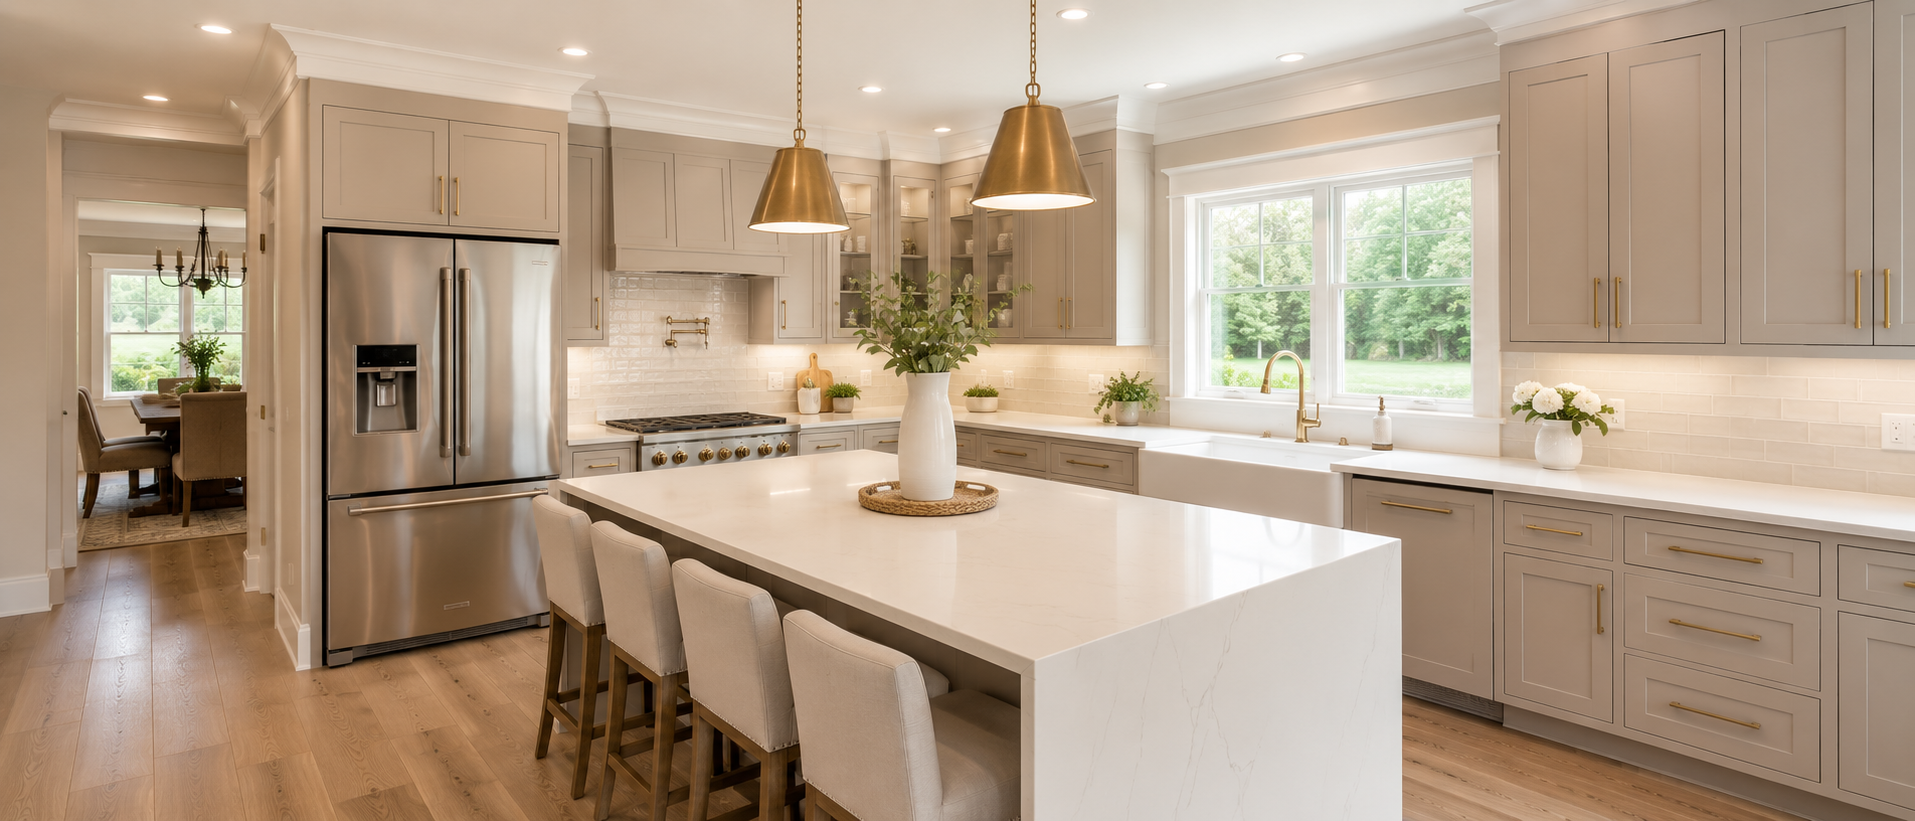
Cabinet Colors That Make Liberty Kitchens Look Polished and Current
If you are staring at a fan deck feeling stuck, you are not alone. Color is the most stressful part of the whole project for most homeowners, because it feels permanent and personal. The goal is a palette that looks current without chasing a trend that dates fast, and that is where having done hundreds of kitchens helps. We can tell you what photographs well, lives well, and holds its value.
Warm whites, soft greige, and muted earth tones are the safe, timeless backbone for most Liberty kitchens. A deeper accent on an island or lower cabinets adds depth without overwhelming the room. These palettes read clean in the morning light most kitchens get and they pair with the wood floors and warm finishes common in the area.
Neighborhoods like Claymont and Foxberry Estates have been trending toward exactly this look: soft warm neutrals and greige tones that feel updated but calm. We carry that read across the whole kitchen rather than picking a different color for every cabinet run, which is what keeps the result looking polished instead of busy.
What the Cabinet Painting Process Looks Like Start to Finish
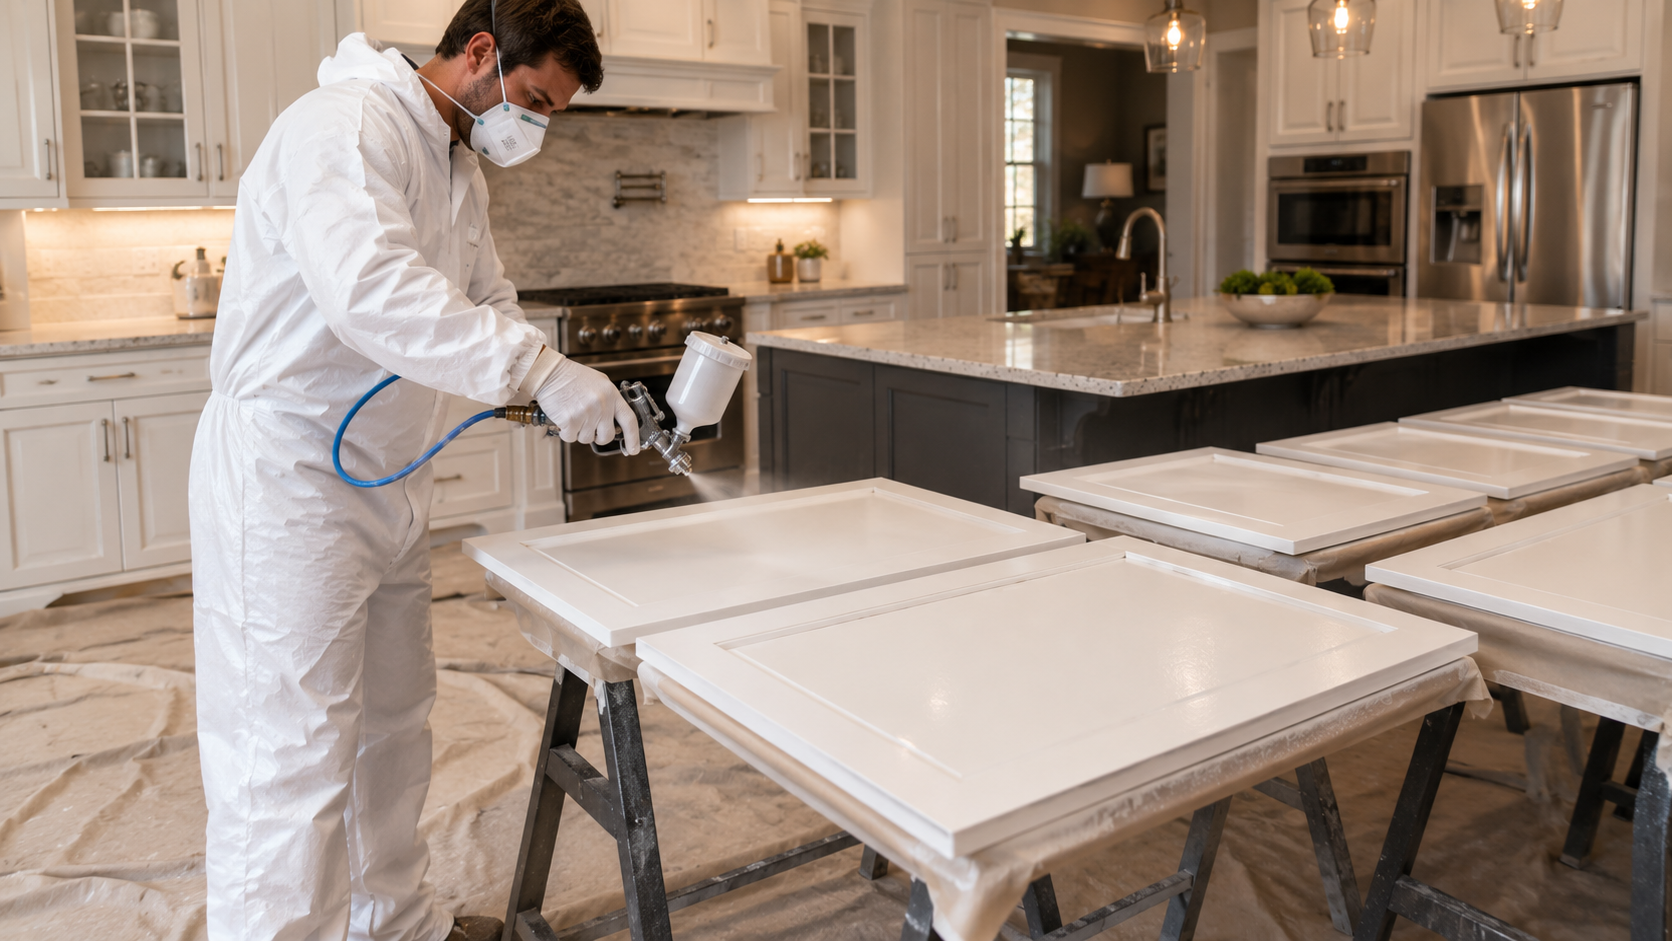
If this is your first time having cabinets painted, knowing the sequence up front removes most of the worry. A quality cabinet finish is a process, not a single coat, and each step is what makes the result smooth, hard, and durable instead of sticky or brush-marked. Here is how a typical job runs.
First we remove the doors and drawers and label everything. Then we clean off years of cooking grease, because nothing bonds to a greasy surface. Next comes sanding to dull the old finish, a bonding primer made for cabinets, and two finish coats sprayed or carefully rolled for an even, factory-like look. We reinstall once everything has cured, not just dried, so the finish is ready for daily use.
Missouri humidity is the variable that changes the timeline. Damp air slows dry and cure times between coats, so we plan the schedule around the season rather than rushing a coat that is not ready. That patience is exactly what separates a finish that lasts years from one that chips within months.
Colors Homeowners Regret, and What to Pick Instead
If you have watched a bold kitchen color go from fresh to dated in a few years, you already know the risk. Some colors photograph beautifully and then wear on you, or wear physically, faster than expected. Knowing which ones to approach carefully saves you from repainting sooner than you should have to.
Very trendy, saturated colors are the usual regrets, because they tie your kitchen to a specific moment and can clash the next time you update floors or counters. Pure, stark white is the other one, and not just for looks. In a busy kitchen it shows every smudge, grease spot, and scuff almost immediately. What we steer most homeowners toward instead is a warm white or soft neutral that hides daily life and stays current far longer.
That grease-and-smudge issue is real in busy Liberty family kitchens, where the stove runs every night. A warm white or greige reads just as bright and clean but forgives the fingerprints and splatter that a stark white puts on display. It is a small shift in shade that makes a big difference in how the kitchen looks two years in.

How to Prep Your Kitchen Before the Painters Arrive
If your job is booked or nearly booked, a little prep on your end keeps everything on schedule and protects your belongings. None of it is hard, but doing it before we arrive means the first morning goes to painting rather than waiting on a kitchen that is not ready.
Empty the cabinets you want painted, uppers and lowers, and clear the countertops near them. Take down anything fragile nearby and give us a clear path to the kitchen. We remove and label all the doors and drawers ourselves, so you do not need to touch those. Plan to use the kitchen in a limited way for a few days, since the cabinets will be out of service while they cure.
One note for older Liberty homes: ventilation matters during a cabinet job. If your kitchen has limited airflow, having a window that opens or a fan available helps the finish cure cleanly and keeps the work area comfortable. We will talk through the ventilation plan at the walkthrough so there are no surprises on day one.
How to Keep Painted Cabinets Looking Sharp for Years
Once the kitchen is back together, a little care keeps that fresh finish looking new far longer. Painted cabinets are durable when they are done right, but they are still a working surface in the hardest-used room in the house. A few simple habits protect your investment and prevent the wear that leads to early touch-ups.
Wipe spills and splatters promptly with a soft, damp cloth and a mild cleaner, never an abrasive scrubber or harsh degreaser that can dull the finish. Avoid letting water pool along the bottom edges near the sink and dishwasher. Give the finish its full cure window, often a couple of weeks, before scrubbing or stacking heavy items against the doors.
Kansas City humidity and everyday cooking steam are the long-term factors here. Moisture and grease are what wear a kitchen finish over time, so running your range hood while you cook and keeping the cabinets wiped down goes a long way. Done consistently, those small steps keep a painted kitchen looking sharp for many years.
Why Choose Big House Painters for Cabinet Painting in Liberty?
We are a family-owned, veteran-owned painting company based right here in Liberty, MO. You work directly with the owners on every project. No subcontractors, no handoffs to a crew you have never met. Our Air Force background taught us that every detail matters and every job has a deadline, and we bring that same discipline into your kitchen.
Cabinets are unforgiving work, so we do not cut the steps that make a finish last: degreasing, sanding, a bonding primer made for cabinets, and full cure time between coats. We protect your countertops, floors, and appliances, label every door and drawer, and do not leave until the result meets our standard. After 17 years in this community, that is simply how we operate.
Cabinet painting is one piece of what we do. We also handle interior and exterior painting, deck staining, drywall repair, and more for homes across the Northland. To see everything we offer in one place, take a look at the full range of work from the professional painters in Liberty, MO families here rely on.
Cabinet Painting FAQs
Common questions from Liberty homeowners before a cabinet painting project. Have one we did not cover? Call (816) 466-4510.
How do I know if my cabinets can be painted instead of replaced?
If the cabinet boxes are solid and square with no water damage or delamination, they can almost always be painted. Peeling, yellowing, scratches, and dated color are all surface issues that paint fixes. A quick walkthrough confirms the structure is sound, and most older Liberty cabinets pass easily.
What cabinet colors are most popular with Liberty homeowners right now?
Warm whites, soft sage, and navy are booking well locally. Warm whites and greige give a clean, timeless base, while sage and navy work beautifully as an island or lower-cabinet accent. We help you pick a shade that suits your light, your finishes, and how the kitchen actually gets used.
How long will I be without a usable kitchen during the job?
Most kitchens run 2 to 4 days. We work in phases and keep the cabinets out of service only while they cure, so you are not fully without a kitchen the whole time. We will give you a clear day-by-day plan at the walkthrough so you can plan meals around it.
What's the difference between DIY cabinet painting and hiring a pro in Liberty?
The gap is surface prep and topcoat quality. Brush marks, peeling, and a sticky finish are the common DIY outcomes, usually from skipped degreasing or the wrong product. A pro degreases, sands, uses a bonding primer made for cabinets, and applies a hard finish that holds up to daily kitchen use.
Do I need to empty my cabinets before the painters start?
Yes. The doors come off and the boxes get painted, so emptying the uppers and lowers ahead of time keeps the job moving. Clearing nearby countertops helps too. We handle removing and labeling all the doors and drawers, so that part is on us.
What makes a painted cabinet finish hold up in a busy kitchen?
Three things: the right primer, full cure time, and the correct sheen. A bonding primer grips the old surface, full curing hardens the finish before daily use, and a satin or semi-gloss sheen stands up to wiping and cleaning. Skip any one of those and the finish wears early.
Cabinet Painting Service Areas Near Liberty, MO
We are based in Liberty and serve homeowners throughout Clay and Platte counties. If you are in the Kansas City Northland, we cover your area.
Let's Give Your Kitchen a Fresh Start. Call (816) 466-4510 or book a walkthrough estimate online. No pressure.
We serve Liberty, Kearney, Smithville, Gladstone, and the greater Kansas City Northland. Family-owned, veteran-owned, based right here in Liberty for over 17 years.